
TL;DR
Acoustic dampening in a closet isn’t about stuffing foam everywhere; it’s about strategic placement and sealing key points. Moving the rig out of the room or ventilating a closet makes a huge difference. Proper treatment and placement turn small spaces into effective recording booths.
Ever feel like your recordings sound muffled, boxy, or overly echoey? The secret isn’t just in the foam — it’s where you put it, and how you arrange your space. Turning a closet into a makeshift vocal booth can be a game-changer, but only if you treat it right.
This guide reveals how to optimize your closet setup with smart placement, layering materials, and ventilation. Whether you’re recording vocals, streaming, or just trying to improve your audio environment, understanding these principles will help you get a professional sound without spending a fortune.
Acoustic dampening
& the rig in the closet.
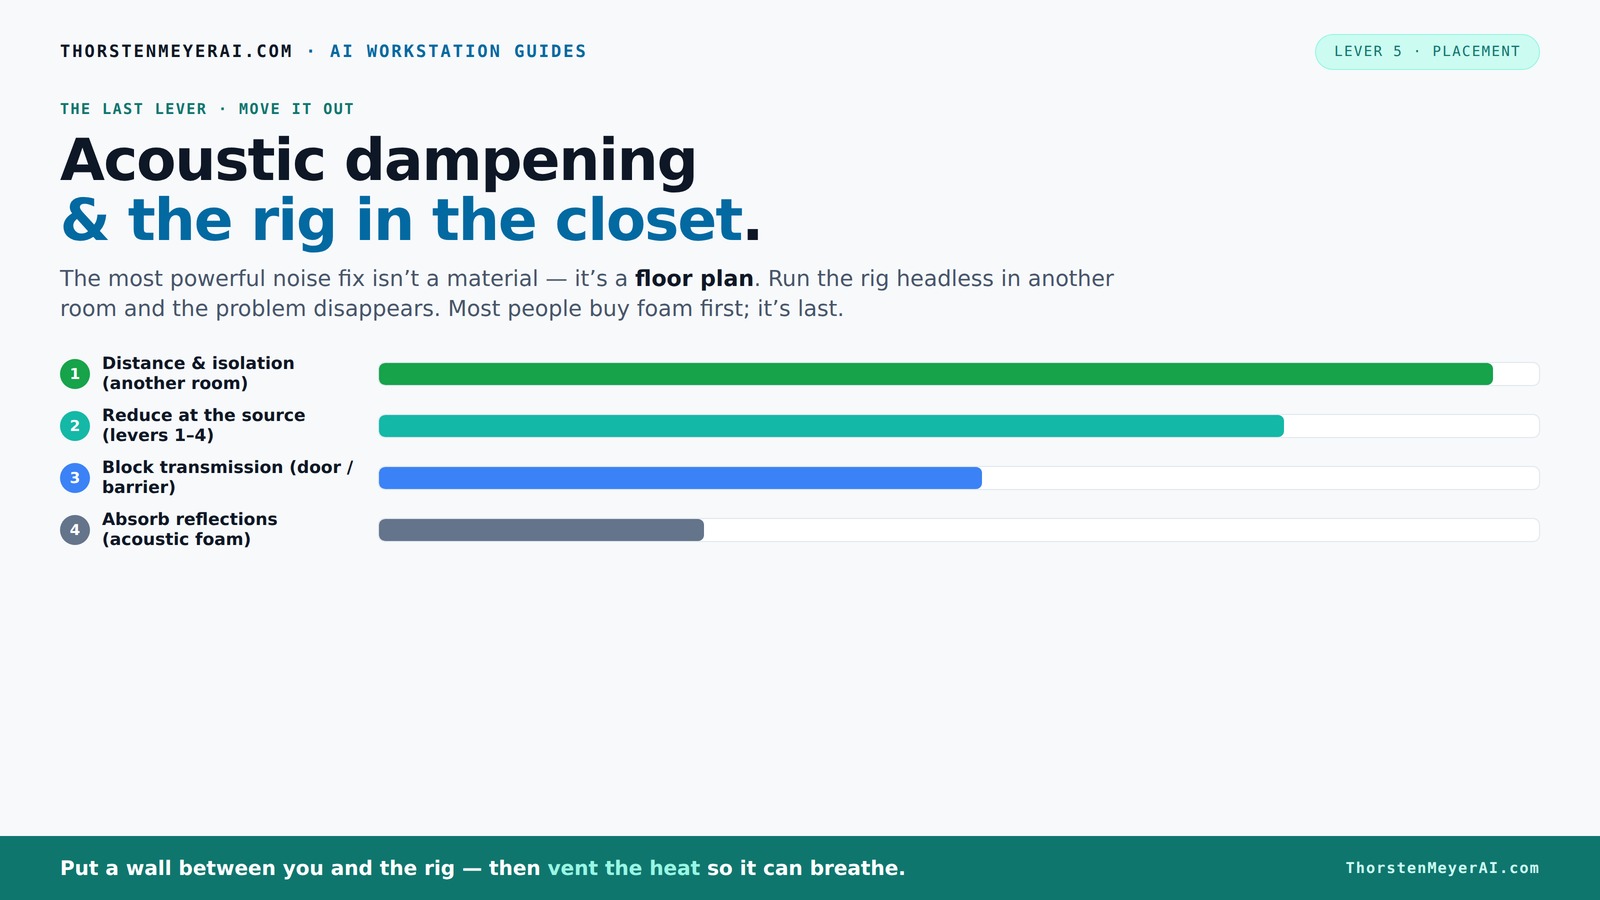
The most powerful noise fix isn’t a material — it’s a floor plan. A rig you can’t hear because it’s in another room beats any amount of foam. Tap the approaches in Part 1 to see what actually works.
(another room)
(levers 1–4)
(door / barrier)
(acoustic foam)
Contain the noise, not the heat
Key Takeaways
- Prioritize placing treatment on the wall behind your mic, not just corners or the door.
- Sealing gaps and treating the door significantly reduces noise leaks in small spaces.
- Ventilate your closet or cabinet to prevent heat buildup, especially for high-power rigs.
- Layer treatment materials—blankets, foam, bass traps—at reflection points for a balanced sound.
- Don’t overdo it; targeted, strategic treatment beats covering every surface with foam.

Focusound 52 Pack Acoustic Foam Panels 1" x 12" x 12" Sound Proof Foam Panles Soundproofing Noise Cancelling Wedge Panels for Home Office Recoding Studio with 300PCS Double-Side Adhesive
Soundproofing - Acoustic foam panels triangular grooves structure for better noise absorption, helps to reduce and absorb unwanted...
As an affiliate, we earn on qualifying purchases.
As an affiliate, we earn on qualifying purchases.
What’s the difference between acoustic dampening and soundproofing? (And why it matters)
Acoustic dampening and soundproofing aren’t the same. Dampening reduces echoes and reflections inside a space, making vocals clearer and less boomy. Soundproofing blocks sound from leaking out or in, preventing noise from disturbing neighbors or escaping.
In a tiny closet, most of your goal is dampening — softening reflections and controlling echoes. Soundproofing, like sealing a door or adding mass to walls, is a bigger project and usually unnecessary unless you’re trying to block noise from outside.
For example, layering blankets and foam inside your closet reduces echo. Adding weatherstripping around the door prevents sound from leaking through gaps. Understanding this difference helps you focus your efforts where they matter most.

'Snap Studio' The Original Vocal Booth, Pro Sound Blankets, Portable Studio-Grade Recording, Sound Isolation, Trusted Globally By Professional Artists, Musicians, VO, Podcasters
#1 Recommended Portable Recording Booth — Featured by Rolling Stone Magazine as the “best sound booth”, Snap Studio’s...
As an affiliate, we earn on qualifying purchases.
As an affiliate, we earn on qualifying purchases.
Why closets are gold mines for small recording spaces — and the big catch
Closets are tiny, enclosed, and often lined with clothes or soft materials, making them naturally good at absorbing sound reflections. They’re like mini vocal booths. But here’s the catch: heat buildup and poor airflow turn a good idea into a nightmare.
Imagine your high-powered PC or mic in a closet. Without proper ventilation, heat will pile up fast, causing your equipment to throttle and fans to scream. A sealed closet traps hot air, risking overheating and damage.
For instance, a DIY closet booth lined with blankets and foam works well until your CPU hits 85°C and starts throttling. Ventilation isn’t optional — it’s mandatory for safety and consistent performance. The trick is to balance sound treatment with airflow, using vents, ducts, or fans.

24 Pack Black 12 x 12 x 2 Inches Pyramid Designed Acoustic Foam Panels, Sound Proof Foam Panels for Walls, High Density and Flame-Retardant Acoustic Panels, Sound Panels for Recording and Home Studio
Exceptional Sound Absorption:These pyramid acoustic panels are engineered to effectively absorb sound waves, reducing echo and reverberation. With...
As an affiliate, we earn on qualifying purchases.
As an affiliate, we earn on qualifying purchases.
Where to place your treatment for maximum sound clarity
Placing acoustic treatment strategically can make your closet sound like a professional studio. The biggest improvement comes from focusing on the wall behind your microphone — that’s where most reflections bounce back into your mic.
Think of your mic as a listener. If the wall behind it is absorbing sound, fewer reflections come back, and your vocals stay clean. Add acoustic panels or blankets on that wall, and you’ll notice a clearer, more natural tone.
Beyond the back wall, treat the ceiling, door, and nearby hard surfaces. Small spaces reflect sound in all directions, so layering absorption here reduces echo and prevents a boxy sound. Don’t forget the door: sealing it with acoustic seals or blankets cuts down leakage and noise.
Understanding the why behind these placement choices helps you make smarter decisions, ensuring your treatment is effective rather than just decorative. Proper placement reduces the need for excessive materials, saving you money and avoiding deadening the sound.

VEVOR 2 Pcs Sound Dampening Blankets, Soundproof Curtains with 96 x 80 in, Soundproof Blanket with Grommets, Studio Grommeted Blanket, for Window, Door, Light Blocker, Music Recording, Black
Sound Absorption & Noise Reduction: Made with a polyester woven surface and recycled cotton filling, this 3-layer physical...
As an affiliate, we earn on qualifying purchases.
As an affiliate, we earn on qualifying purchases.
Treat the door and walls — the biggest leaks in a closet booth
The door and wall gaps are the weakest points for sound leaks. Sealing cracks with weatherstripping or acoustic seals can cut noise transmission dramatically. Adding a thick blanket or acoustic panel over the door improves isolation without making it feel claustrophobic.
For example, a streamer I know used moving blankets and weatherstripping on her closet door. The result? Her mic now captures almost no outside noise, and her voice sounds rich and focused.
Walls need treatment, too. Affixing foam panels or blankets in a layered pattern — with some space behind to avoid deadening the sound — creates a more natural, lively recording environment. The goal is to prevent sound from escaping or entering through these weak points, which can otherwise compromise your recording quality or introduce unwanted noise.
Proper sealing and treatment at these points are critical because they directly impact the clarity and isolation of your recordings. Small gaps and untreated surfaces can cause reflections or noise leaks that undermine your efforts, so addressing them thoroughly is essential.
Corners aren’t the only place to treat — but they help a lot
Corner traps are popular, but they’re not the only or even the most important spots. For more on acoustic treatment, visit this site. In a small closet, treating the wall behind the mic is more effective. Still, adding bass traps in the upper corners can tame low-frequency issues that cause boomy or muddy vocals.
For instance, a YouTube creator installed foam on the walls and added a small bass trap in the ceiling corner. Her vocals became clearer, with less low-end buildup. It’s about layering treatments — wall behind the mic, ceiling, door, and corners all matter.
In tiny spaces, focus on the reflection points first, then add bass traps if low frequencies sound muddy or boomy. Layering different treatments allows you to target specific issues, like flutter echoes or low-end buildup, without over-treating the entire space. This strategic approach ensures clarity and balance in your recordings.
How much material do you really need in a tiny closet?
In a small space, less is often more. You don’t need to cover every inch with foam. Focus on key reflection points: the wall behind the mic, the ceiling, and the door. Use thick blankets, acoustic panels, or foam panels with some space behind for better absorption.
For example, a DIY project used four foam panels around the mic and a thick moving blanket over the door. The sound improved significantly without turning the closet into a foam jungle.
Layering materials and spacing them properly is more effective than just piling up foam — quality over quantity wins here. Over-treating can deaden your sound, making it sound unnatural and dull. Instead, aim for a balanced setup that reduces problematic reflections while preserving some natural room tone.
Should you treat the ceiling, floor, or wall first? The quick answer
Start with the wall behind your mic — that’s the primary reflection path. Then, add treatment to the ceiling and door. The floor, usually made of hard material, can be softened with a rug or carpet to reduce bounce.
For example, placing a rug under your desk and acoustic panels on the ceiling can dramatically improve sound clarity. Focus on the reflection points, then address low-frequency issues if needed.
Layering treatments in the right order creates a natural, balanced sound in your tiny booth. Prioritizing the reflection points first ensures that your main sound source is captured cleanly, reducing the need for excessive post-processing or additional treatments.
Do you really need bass traps in a closet? Yes, if low-end is muddy
Bass traps are crucial when low frequencies cause your vocals to sound muddy or boomy. Small rooms reflect low-end sound waves, creating standing waves and uneven frequency response.
For instance, adding a small bass trap in the upper corner of a closet reduced low-end muddiness in recordings, giving vocals more clarity and presence.
If your recordings sound hollow or boomy, low-frequency treatment can fix it. Otherwise, you risk a boxy, unnatural sound. The tradeoff is that bass traps can take up space, but their benefit in providing a balanced, natural sound often outweighs the inconvenience, especially in tight environments.
Common mistakes that ruin your closet sound — and how to avoid them
Over-treating with foam and blankets can deaden the sound, making vocals sound dull. Failing to seal the door leaks lets outside noise bleed in, ruining recordings. Ignoring ventilation causes equipment overheating and noise issues.
For example, a beginner tried to line every wall with foam but ended up with a dead-sounding vocal booth. A better approach was targeted treatment, sealing gaps, and ventilating properly. Overdoing foam can create an unnatural, lifeless sound, diminishing the natural tone of your voice and making recordings sound flat.
Focusing on the reflection points, sealing gaps effectively, and ensuring proper airflow prevents these issues. Layer your treatment thoughtfully, and remember: more isn’t always better. A balanced approach yields clearer, more natural recordings without sacrificing comfort or risking equipment safety.
Frequently Asked Questions
Does acoustic foam really soundproof a closet?
Acoustic foam primarily reduces echo and reflections inside the room. It’s not designed to block sound from entering or leaving. For soundproofing, sealing gaps and adding mass is necessary. Foam makes your voice clearer but won’t stop noise from escaping.
Where should I place my microphone in a closet booth?
Place your microphone close to the wall behind it, ideally about 6–12 inches away, to minimize reflections. Use a shock mount and keep it centered to avoid unwanted room tone. Experiment with positioning for the clearest sound.
Should I treat the ceiling or walls first?
Start with the wall behind your mic, then move on to the ceiling and door. These are reflection points that impact vocal clarity. Floor treatment with a rug helps reduce bounce. Layering in this order provides the best results.
Do I need bass traps in a small closet?
Yes, if you notice low-end muddiness or boomy vocals. Small spaces reflect low frequencies, creating uneven sound. Bass traps help smooth out the low end, giving your recordings more clarity.
How much material do I need for a decent treatment?
Focus on key reflection points: the wall behind the mic, ceiling, and door. A few foam panels and blankets are enough for a noticeable improvement. Don’t overdo it — strategic placement is more effective than covering every inch.
Conclusion
Transforming a closet into a recording space isn’t about stuffing it with foam. It’s about smart placement, sealing leaks, and balancing sound absorption with ventilation. Your best bet is to treat the reflection points, seal gaps, and keep airflow flowing.
Remember, the goal isn’t perfection — it’s clarity. With a few simple tweaks, your tiny space can produce professional-sounding vocals that cut through the noise and sound natural. So, give your closet a second look, and start treating it like a real studio.