
To achieve a clean cockpit with internal wiring for handlebars and custom controls, route your wires carefully along the handlebar bends, avoiding sharp turns and excess slack. Use waterproof connectors and protect your cables with sleeves or conduits for durability. Secure everything with cable ties or clamps, and place connectors where they’re easy to access for maintenance. Proper cable management not only simplifies setup but also boosts your bike’s appearance—continue to explore how to perfect your wiring system.
Key Takeaways
- Plan wire routing along handlebar bends, maintaining slack to avoid interference and ensure smooth movement.
- Use waterproof connectors and sealing methods for durability and protection against moisture and environmental factors.
- Secure wires with clamps, cable ties, and mounts to keep a tidy appearance and prevent tangling or damage.
- Incorporate quick disconnects at accessible points for easy maintenance, upgrades, and troubleshooting.
- Follow best practices for cable organization to enhance aesthetics, reliability, and overall cockpit cleanliness.

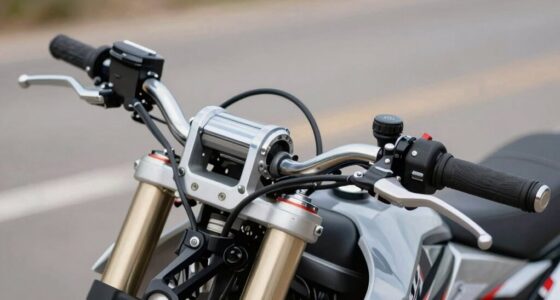
Internal wiring for handlebars is a practical way to create a clean, streamlined look on your bike or motorcycle. By routing wires inside the handlebars, you eliminate clutter and reduce the chances of cables snagging or getting damaged. Proper wire routing is essential for both aesthetics and functionality, ensuring that your controls operate smoothly and reliably. When planning your internal wiring setup, you need to carefully consider how the wires will run through the handlebars, avoiding sharp bends or areas where they could wear down over time. Using flexible, high-quality cable sleeves or conduits can help protect the wires from abrasion and environmental elements. Additionally, understanding the importance of cable management can help maintain an organized and durable wiring system. Choosing the right connector types is equally important to guarantee secure, reliable connections that are easy to maintain or modify later. Waterproof connectors are especially useful if you ride in wet conditions, preventing moisture from causing corrosion or connectivity issues. Quick disconnects allow you to easily remove or replace controls without disturbing the entire wiring system, which is handy for maintenance or upgrades. Inline connectors can be tucked neatly inside the handlebars, maintaining the clean look while providing solid electrical contact. When installing internal wiring, you’ll want to plan your connector placements carefully. Position connectors at accessible points, such as near control switches or at the base of the handlebars, so you can reach them without stripping away the handlebar covers. Make sure the connectors are rated for your electrical load and environmental conditions, and use heat-shrink tubing or sealing grommets to reinforce the connections. This helps prevent moisture ingress and mechanical stress from affecting your wiring over time. Another key aspect is to keep the wiring organized and secured along the length of the handlebar. Use cable ties, clamps, or adhesive-backed mounts to keep wires from shifting or rubbing against the inner walls of the handlebar. Maintain some slack to accommodate steering movement but avoid excess cable that could cause noise or interference. When routing wires, try to follow the natural bend of the handlebar and avoid crossing wires unnecessarily, which can cause tangling or strain on the connections.

USANOOKS Microfiber Cleaning Cloth Grey - 12 Pcs (12.5"x12.5") - High Performance - 1200 Washes, Ultra Absorbent Microfiber Towel Weave Grime & Liquid for Streak-Free Mirror Shine - Car Washing Cloth
10x GRIP-ROOT WEAVE - TRAP MORE, WORK LESS: Ultra-absorbent microfiber towels for car Grip Root weave works like...
As an affiliate, we earn on qualifying purchases.
Frequently Asked Questions
What Tools Are Recommended for Internal Wiring Installation?
You should use wire strippers and crimping tools to prepare and connect wires properly. A heat gun helps secure wire insulation and connectors, ensuring a neat finish. It’s also smart to have small screwdrivers for tightening connections and cable organizers to keep wiring tidy. Using high-quality wire connectors prevents loose connections, and a multimeter verifies the wiring’s integrity, making your installation safe and reliable.
How Do I Prevent Electrical Interference in Wiring?
To prevent electrical interference, you should use proper grounding techniques, ensuring all wires are securely grounded to reduce noise. Additionally, apply shielding methods, such as using shielded cables or wrapping wiring with foil or braid, to block electromagnetic interference. Keep signal and power wires separate, and avoid running them parallel for long distances. These steps help maintain clean signals and reliable operation of your cockpit controls.
What Safety Precautions Should I Take During Wiring?
When wiring, you should always follow grounding techniques to prevent electrical hazards and interference. Use wire routing best practices by keeping power and signal wires separated, and avoid sharp bends to prevent damage. Always wear insulated gloves and turn off the power before working. Secure all connections tightly and double-check for proper grounding. These precautions guarantee your safety and help maintain a clean, reliable wiring setup.
How Do I Troubleshoot Wiring Issues in Custom Controls?
Oh, troubleshooting wiring issues? Easy! First, check your wiring color codes—red for power, black for ground, and so on. Then, inspect connector types for corrosion or loose pins. Use a multimeter to test continuity and voltage. If something’s off, re-check your connections, ensuring they match the schematics. Remember, patience and attention to detail turn chaos into clarity, avoiding the “fun” of chasing phantom shorts!
Can I Upgrade Wiring Without Removing Handlebars?
You can upgrade wiring without removing handlebars by carefully accessing the internal wiring through existing openings or by loosening the handlebar clamps slightly. Keep handlebar ergonomics in mind to avoid discomfort. Use wiring color codes to identify and replace wires accurately, ensuring proper connections. Take your time to avoid damaging the controls or wiring harness. If needed, consult your bike’s manual for specific routing and color code details.

HOMEXCEL Microfiber Cleaning Cloth 12 Pack, 12.5 x 12.5 inch Microfiber Towels for Cars, Ultra Absorbent Washing Cloth, Lint Free Streak Free Cleaning Rags for Car, Kitchen, and Window (Grey)
Unparalleled Cleaning Performance: Our microfiber towels provide outstanding water absorption and adhesion; effortlessly absorb dirt and liquid, delivering...
As an affiliate, we earn on qualifying purchases.
Conclusion
Keeping your cockpit clean with tidy internal wiring is like giving your bike a clear, open sky to breathe. It not only looks sleek but also prevents future headaches and guarantees smooth control. When you take the time to organize those wires, you’re setting your ride up for success—like a conductor guiding a symphony. So, invest in neat wiring now, and enjoy a ride that’s as flawless as a perfectly choreographed dance.

AIDEA Microfiber Cleaning Cloth-50PK, Microfiber Towels for Cars, 12×12"
Super Absorbent: Experience the excellent quality of AIDEA all-purpose microfiber cleaning cloths; made from premium materials; offering exceptional...
As an affiliate, we earn on qualifying purchases.
Chemical Guys, 7-Piece Car Cleaning Kit, Wash, Wheel & Interior Cleaners
CAR CLEANING KIT WITH TOTAL INTERIOR (HOL357): Includes wash soap, wheel cleaner, Total Interior, a plush wash mitt,...
As an affiliate, we earn on qualifying purchases.