
If your bike keeps losing power, check the ignition switch and wiring connections first. Look for corrosion, loose wires, or frayed cables around the switch. Use a multimeter to test for continuity in the “on” and “off” positions, and inspect for internal wear or damage. Tighten any loose connections and clean contacts if needed. If issues persist, replacing the switch might be necessary. Keep exploring to find out more about troubleshooting effectively.
Key Takeaways
- Inspect the ignition switch for corrosion, loose wiring, or damage; clean and tighten connections as needed.
- Use a multimeter to test switch continuity in all key positions to identify internal faults.
- Check related relays and fuses linked to the ignition system for blown or loose components.
- Examine wiring harnesses for frayed or damaged wires that could disrupt power flow.
- Consider replacing the ignition switch if internal wear or corrosion prevents proper engagement.
Have you ever turned the key in your ignition only to find your vehicle won’t start? It’s frustrating, especially when you’re in a hurry or enthusiastic to hit the road. One common culprit behind these issues is a problem with the ignition switch itself. Troubleshooting begins with understanding that key switch issues often stem from faulty circuit connections. If the circuit connections inside or around the ignition switch are loose, corroded, or damaged, your bike may fail to send the proper signals to start or even lose power unexpectedly.
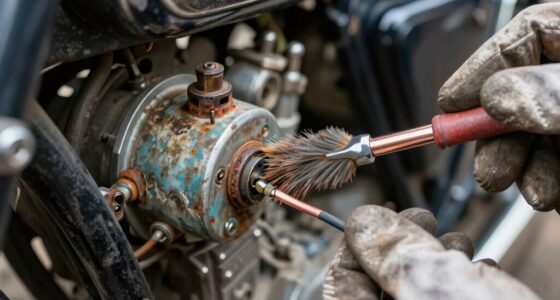
Start by inspecting the ignition switch and its wiring. Remove any panels or covers necessary to access the switch and follow the wiring harness. Look for signs of corrosion, frayed wires, or loose connections. Corrosion can occur over time due to moisture exposure, which can interfere with the flow of electrical signals. If you notice any corrosion or looseness, clean the contacts carefully with a contact cleaner or a small brush. Tighten any loose connections to guarantee a solid electrical pathway. Additionally, understanding the electrical system of your bike can help identify underlying issues affecting multiple components.
Next, consider the key switch itself. Sometimes, the internal contacts inside the switch can wear out or become misaligned, causing intermittent power loss or complete failure. Turn the key to different positions—on, off, and accessory—and observe if any changes happen. If the switch feels loose or doesn’t engage properly, it might be time to replace it. Keep in mind that a faulty ignition switch can sometimes cause your entire electrical system to malfunction, resulting in the bike losing all power unexpectedly.
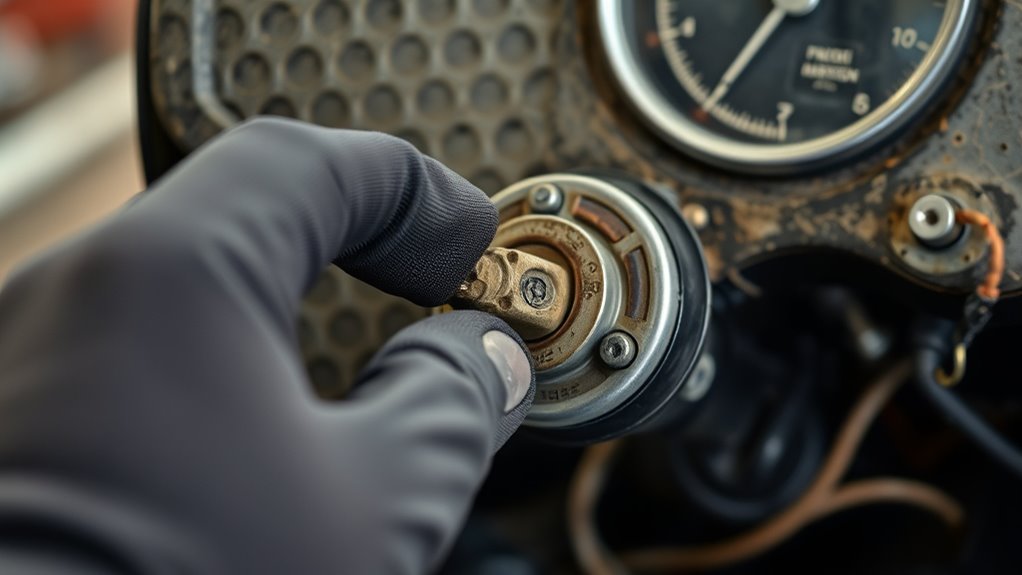
Another step is to test the circuit connections with a multimeter. With the key in the “on” position, check for continuity across the switch contacts. If there’s no continuity where there should be, or if the readings are inconsistent, it indicates a problem within the switch or its wiring. Testing the circuit connections helps pinpoint whether the issue is with the switch itself or other parts of the wiring.
Sometimes, the problem isn’t just with the key switch but also with the associated relays or fuses. Make sure all fuses related to the ignition and electrical system are intact. A blown fuse can mimic key switch issues and lead to power loss. Replacing blown fuses and confirming proper circuit connections can resolve these issues.

BRCOVAN Motorcycle Phone Mount with Qi Wireless & USB-C Charger
Wireless Charger and PD/USB-C Charging Port: The wireless charger and PD/USB-C charging port of this motorcycle phone mount...
As an affiliate, we earn on qualifying purchases.
Frequently Asked Questions
Can a Faulty Ignition Switch Damage Other Electrical Components?
A faulty ignition switch can indeed cause electrical system damage, especially if its durability is compromised. When it malfunctions, it may send inconsistent power signals or short circuits, risking damage to other electrical components like the ECU, lights, or sensors. You should replace a worn or faulty ignition switch promptly to prevent further electrical issues and guarantee your bike’s electrical system stays intact and reliable.
How Long Does It Typically Take to Replace an Ignition Switch?
Replacing an ignition switch typically takes about 30 minutes to an hour, depending on your bike’s model. You’ll need to disconnect the battery, locate the switch, and carefully handle the ignition wiring. During switch replacement, make certain you follow proper procedures to avoid damaging nearby components. It’s a straightforward process if you have basic mechanical skills, but taking your time helps prevent mistakes and ensures a secure, long-lasting installation.
Are There Temporary Fixes for Ignition Switch Problems?
Yes, you can try temporary fixes like ignition bypass to get your bike running. This involves connecting the wires directly to bypass a faulty ignition switch, but only do this if you’re comfortable and understand the risks. Keep in mind, these are just short-term solutions; a proper repair or replacement is essential for safety and reliability. Never leave the bypass active for long periods.
Is Ignition Switch Failure Common in Specific Bike Models?
Certain bike models are more prone to ignition switch failure, especially those with lower-quality ignition switch parts. You might notice model-specific failures where the switch wears out faster or becomes unreliable over time. If your bike is known for ignition switch issues, consider upgrading to a higher-quality component or consulting a mechanic to prevent unexpected power losses. Regular maintenance helps catch these problems early and guarantees smoother rides.
What Safety Precautions Should I Take When Troubleshooting the Ignition Switch?
Like a knight preparing for battle, you should don safety gear—gloves, goggles, and proper clothing—before troubleshooting. Disconnect the battery to prevent sparks, and use insulated tools for circuit testing. Work in a well-ventilated area, avoid open flames, and keep a fire extinguisher nearby. These precautions protect you from electrical shocks, short circuits, and other hazards, ensuring your safety while diagnosing and fixing the ignition switch.

BRCOVAN Anti-Theft Motorcycle Phone Mount Holder with Vibration Dampener
Sturdy & Secure: The main body of this motorcycle phone mount is made of PA66+GF30% high-strength material, with...
As an affiliate, we earn on qualifying purchases.
Conclusion
If your bike’s power keeps slipping away, it might just be a gentle nudge toward a closer look at your ignition switch. Sometimes, a little attention and patience can clear the way for smoother rides ahead. Think of it as fine-tuning a trusted companion—address the small details, and you’ll find your journey becomes a lot more enjoyable. Remember, a little care now can keep you cruising happily down the road later.
Quad Lock Motorcycle Handlebar Phone Mount for iPhone, Galaxy Pixel and Universal Adapters
The Strongest, Most Secure & Versatile Smartphone Motorcycle Handlebar Mount
As an affiliate, we earn on qualifying purchases.

BRCOVAN Anti-Theft Aluminum Alloy Motorcycle Phone Mount Holder
Sturdy & Secure: Main body made of 6061-T6 aluminum alloy. This motorcycle phone mount equipped with vibration dampener....
As an affiliate, we earn on qualifying purchases.